
With cooler fall temperatures arriving in Colorado comes a variety of tasks every homeowner should complete to protect their yard during the cold winter months. Our lawn care professionals created this list of items to tackle in order to prepare your yard for winter.
Table of Contents
TL;DR: What can I do for my plants before winter comes?
Aerate
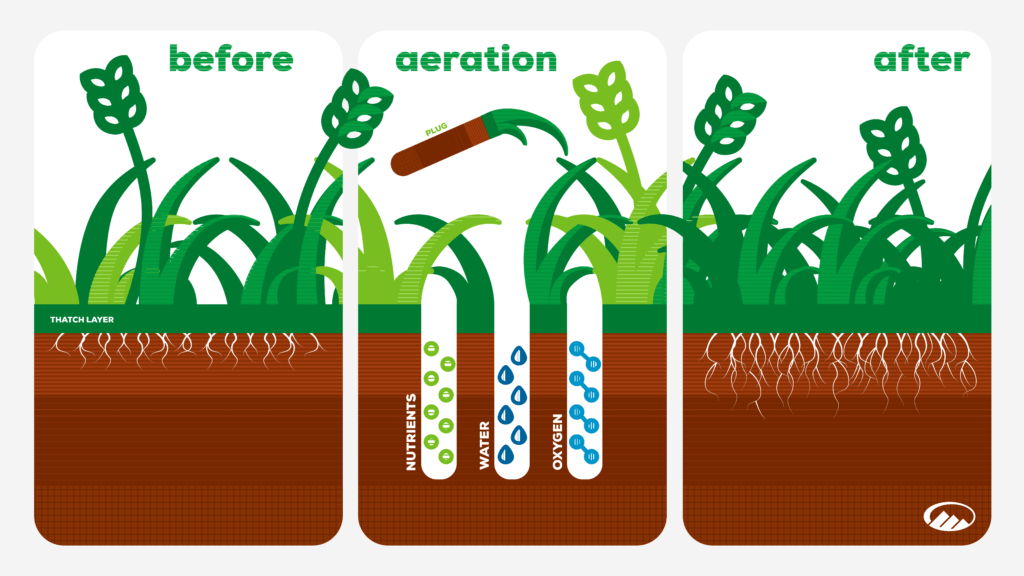
If you have not already done so, aerate your turfgrass. There are many benefits to aerating your lawn. This chore will lessen soil compaction and allow nutrients, oxygen, and water to penetrate your lawn, keeping it lush and green. Keep in mind that depending on the type of grass you grow and how much traffic is on your lawn, will determine which season you should aerate and how often.
Fertilize
Fertilizing your lawn is an important task to take care of because your grass utilizes nutrients from the soil, depleting its reserves, and will need refilling. Nutrients can be recycled back into the soil by using mulching blades that return the clippings to the soil to be broke down back into nutrients for the turf. Removing grass clippings essentially equates to the removal of your fertilizer from the lawn. Even with recycling your clippings, additional fertilizer, especially nitrogen, will be required to maintain a thick lush lawn.
The three macronutrients for turfgrass are (N) nitrogen, (P) phosphorus, and (K) potassium. Homeowners should fertilize using a high nitrogen fertilizer such as 32-0-8 (32% N – 0% P – 8% K). The numbers represent the percentage, by weight, of that nutrient in the bag. These numbers indicate the bag has 32% nitrogen in the bag which equates to 16 lbs. of nitrogen in a 50 lb. bag. Nitrogen is the element most abundantly used by turfgrass and is not readily present in most soils, where phosphorous and potassium are quite common in soils and is why your fertilize should have this formulation.


Nitrogen is needed in greater amounts than all other nutrients. Nitrogen is important for the growth, color, and density of turf grass.
Phosphorus is important for root development and is readily available in our soils.
Potassium helps turf tolerate stress caused by disease, drought, wear-and-tear and cold temperatures.
Aim to apply 1 – 1.5 lb. Nitrogen per 1000 square feet of turf in fall. This late-season formula will boost energy storage for early spring green-up.
Complete The Last Mow Of The Season
Your last mow of the year should be close to your normal mow height of around 2.5″- 3”. This length will allow for protection of the turf crown while being short enough to discourage snow mold. Cutting it below 2” can damage your lawn and hinder its ability to grow back.
Winter means fewer hours of sunlight. Pair that with colder temperatures and your lawn can end up stressed if not maintained properly. For more tips on mowing over winter be sure to check out our blog “Should I Mow My Lawn in Winter?”.
Winterize Your Irrigation System & Water Features
Prior to the first freeze of the season, your backflow should be drained to protect it from freeze damage. Damage to an irrigation system can become costly to fix if a pipe bursts, a sprinkler freezes and cracks, or a lateral line forms a crack allowing a slow leak next spring.
Before the ground begins to freeze, the system should be blown out. This process involves blowing compressed air through your irrigation pipes and heads to ensure that most of the water is removed. Any water left in the pipes could freeze and cause them to break if not done properly. Our step-by-step video below will help you get started.
Hi, I’m Stephanie from Timberline Landscaping, and today we’re going to give you a brief tutorial on how to drain your irrigation system. This time of year, it’s very important to drain your irrigation system overnight when we get freezing temperatures. It’s going to help protect the portions of your irrigation system that are above ground. You can still turn your irrigation system back on during the day when temperatures warm up to keep the water going to your turf areas and other plant materials.
We’re going to start out inside of your house with how to turn off the water to your irrigation system. So here we are inside of the home. We’re going to turn off the water; that’s our first step. It’s going to be near to your water heater and other systems. Yours may not look exactly like this but should be similar. So you’ve got your main water shut-off for the house, which would be these valves here. Your irrigation system is going to tee off of that main line. So here’s where our irrigation turns off. You can see that here our valve is in line with the pipe, which means that the water is turned on to the system. So we’re just going to turn that 90 degrees to shut off the water. Since we’ve done it at the tee, we’ve only turned off the water to the irrigation system itself, which is going to keep the water going to the rest of your home.
So for our next step, we are out at our backflow. This is typically going to be on the side of your home. You’re going to have something that looks very similar to this. We’ve got two valves here; currently they’re open. We’re going to partially close them by turning them to a 45 degree angle. We don’t want to close it all the way because we don’t want to block that water in completely. We want to leave room for it to escape and move as things freeze. Next, we’re going to take a dime or a screwdriver and we’re going to turn our test cocks to a 45 degree angle as well. You just want to match it up with the angle of your ball valve. So here we’ve got two of them; you may have more of these that you need to open. And lastly here, we are just going to open our valve at the bottom, and you will see some water escaping to let that water drain out. That means that we now have this prepped, all of the water drained out, so that we’re good to go for a freeze overnight.
So for our third and final step, we’re back at the water shut-off. You want to have a bucket for this step. Right where we have the water turned off, we’ve got a small valve here. Keep your bucket handy because when you open this, water is going to come out. Catch as much as you can in there and just open that valve up. This is draining the rest of your system. So now that the water is flushed out of the system, we want to make sure we put this cap back on here nice and tight.
So now that your system is drained, it’s protected from freezing temperatures overnight. Here in Colorado where we are, it’s still very important to have your system blown out before we get some of those harder temperatures over the winter. That’s going to make sure that you’re protecting your pipes that are under the ground when that ground starts to freeze. For us, we recommend doing it around the middle to end of October to ensure that you protect your entire irrigation system. Thanks so much for joining us for how to drain your irrigation system.
If you have ponds or waterfalls, it is also important to winterize these water features as well. Remove any plants or algae and take the pump out. A pond will freeze over during winter which means anything below it, like fish, will receive limited oxygen. If you decide to keep the water feature running during winter, it is recommended to leave the pump on and keep the water level consistent, so the water does not evaporate. Turning the pump on and off can cause cracks and damage the feature. Take out the filters too, as these can clog with ice if there is a freeze.
Wrap Tree Trunks

Sunscald happens on the South and West-facing side of trees in the wintertime (almost like a sunburn). The warm sun can cause thawing during the day and the cool nights can refreeze the plant cells and this can cause them to burst and result in cracks in the trunk. If the tree gets damaged, it’s essentially an open wound that can lead to diseases and cause nutrient and water disruption. If not cared for properly it could eventually lead to the death of the tree.
Trees with a 6” or less caliper (trunk diameter) and smooth thin bark should have their trunks wrapped over the winter. Wrap trees in October and November and remove wrap around the end of April. Avoid leaving the tree wrap on during the summer months because this can lead to an increase of insects and disease. Tree wrap is available at your local hardware or garden center.
Protect Plants With Mulch
Mulch aids in protecting plant and tree roots from freezing winter temperatures. Applying mulch around the first freeze can insulate the soil and keep soil temperatures from dropping. Living in Colorado, we experience warm spells from time to time in the winter months, and adding mulch will prevent new growth from happening on those warmer days when your plants think it is springtime and it’s time to wake up. Stick to a 3” maximum depth and avoid piling mulch on the trunk of your tree or directly on the stems of your shrubs. This keeps the plant too wet, and in turn makes them more susceptible to rotting, insects, and diseases.
Organic Mulch
Inorganic Mulch
- Wood chips
- Straw
- Chunk bark
- Lawn clippings
- Leaves
- Newspaper/Cardboard
- Rock
- Pea gravel
- Crushed rock
- Shredded rubber
- Cobblestone
- Lava rock
Cut Back Perennials
Perennials should be cut back during this time of year after all foliage has died back. This leaves a clean slate for regrowth come springtime. We recommend leaving ornamental grasses and Russian sage uncut until early spring, as they provide great winter interest in the garden. Be sure to cut them back prior to when spring growth resumes.

Remove Annual Flowers & Annual Vegetables
Annual flowers and annual vegetables should be removed from your garden and added to your compost bin, as long as they are free of mold and disease. This provides them with plenty of time to break down over winter, providing rich compost for planting in the spring. Any annuals that have been exposed to disease or mold should be removed and thrown away, so it does not overwinter and infect spring growth. Our Colorado Composting Guide is a great resource if you would like to learn more.
Plant A Winter Garden
Fall is the perfect time of year to plant winter-friendly crops like garlic, spinach, and beets. Remember to cover them when freezing temperatures are forecasted. Decorative peppers, ornamental kale, pansies, and chrysanthemums are also plants that will tolerate the colder weather and still add some beautiful color to your landscape. Holly adds some texture with its leaves and berries and can be used to decorate for the holidays. Want to dive a little deeper? Check out our Planting for Winter Interest blog for more seasonal ideas.
Remember To Winter Water On Days Over 40°F
On average, 1 inch of rain equals 10 inches of snow which means that snowfall simply will not provide enough water necessary for plant material over the Winter months. Newly planted trees and shrubs run the risk of frost damage or even death without Winter watering. Keeping the soil moist will prevent the roots from drying out and the chances of root loss and dieback will decrease.
Purchase a moisture meter to check the moisture levels of your plant material over the Winter months. The best thing you can do for most of your plants is to make sure that the root zone is wet prior to the ground freezing. Only water on days over 40 degrees. Do not turn on your irrigation system during the Winter because it can lead to frozen pipes which can then lead to costly repairs. We recommend using a hose to water your plants but be sure to disconnect the hose from the house and drain the hose after each use to avoid damage from freezing temperatures. More information and instruction on Winter watering practices are available.
Need some one to blowout your irrigation? Contact us, or consider our other maintenance services.