
Skip to content
  • Residential
    • Design & Construction
    • Maintenance
    • Gardening
    • Irrigation
    • Tree Care & Plant Health
    • Outdoor Lighting & Audio
    • Christmas Lighting
    • Lawn Care
  • Commercial
    • Construction
    • Maintenance
    • Irrigation
    • Snow & Ice Removal
    • Tree Care & Plant Health
    • Christmas Lighting
    • Trails
    • Outdoor Sanitation
  • Resources
    • Downloadable Resources
    • Video Library
  • Blog
  • Contact Us
Menu
  • About Us
  • Careers
  • Search
  • Pay My Bill
  • (719) 638-1000
  • Leave a Review
Menu
  • Timberline Landscaping
  • Residential Landscaping
    • Design & Construction
    • Residential Maintenance
    • Lawn Care
    • Gardening Services
    • Residential Irrigation
    • Tree Care & Plant Health
    • Outdoor Lighting & Audio
    • Residential Christmas Lighting
    • Christmas Lights Guide
  • Commercial Landscaping
    • Commercial Construction
    • Commercial Maintenance
    • Commercial Irrigation
    • Snow & Ice Removal
    • Tree Care & Plant Health
    • Commercial Christmas Lighting
    • Trails
  • Resources
    • Downloadable Resources
    • Video Library
  • Contact Us
  • Blog
  • Leave A Review
  • About Us
  • Careers
  • Search
  • Pay My Bill
  • 719.638.1000
  • Linked In
  • Twitter
  • Pinterest
  • Facebook
  • Instagram
  • Youtube

Step-By-Step Guide To Repotting All Your Plants [With 8 Do and Do Not’s]

  • September 27, 2023
  • Plant Guides, Project Ideas

Table of Contents

TL;DR: Whats the Best Way To Repot My plants?

Answer:

Start by thoroughly cleaning and drying the new pot, it should be about 1 to 2 inches wider in diameter than the current one, ensuring it’s both deep and wide enough to accommodate the root ball plus some new soil. Gently clean off any old compacted soil from the roots and moisten the fresh soil before placing the plant. Position the root ball so that about 2 inches of organic potting soil can sit above it, then top it off with a ¼-inch layer of compost. Finally, water the plant thoroughly to help it settle in.
Wide shot of plants ready about to be repotting

How do you know when it’s time to repot your plants? Are your seedlings ready to grow outside? We’ll answer those questions, plus many more about transplanting (or repotting) your plants in this article.

Did you know that plants can suffocate if they outgrow their pot? Also, not every plant wants to be in the vast world of the outdoors. There are some important factors you should look for when finding a new home for your plant friends.

Read on to find our top DO and DO NOT’s on transplanting, along with a step-by-step guide on how to re-home your plants.

How Do I Know If My Plant Is Ready For A New Home?

Button-Bachelor-Cornflower

First, you need to determine if your plant is ready to be transplanted into a new pot or snuggle into the soil in your garden. If you just purchased your house plant, give it at least a couple of months before transplanting. It’s important to not rush the plant into a new home as roots are still forming and the plant will likely not withstand the stress of transplanting.

Onions-01

If you just purchased babies or vegetables, they need about 3 weeks before they’re ready to move. Check to see if you can see a strong root ball. What does that look like? Our expert says to look for longer and thicker white roots. If there’s any brown and soft roots, they are rotted. If you can’t see a healthy root ball, it’s not time for transplanting just yet.

Still not sure? A great way to tell if your plant is ready is to wait for the second foliage to appear– this lets you know that the roots are established enough to be moved. If you transplant just after the first foliage appears, it may be too soon and you might risk losing that plant after transplanting. When in doubt, practice patience!

How Do I Pick The Right New Home For My Plant?

Not Too Big...

The size of the new pot, or hole in the ground if outside, is very important – you don’t want to increase the diameter more than 2” bigger than the current pot. Doing so isn’t always catastrophic, but your chances of success are greatly reduced.

Not Too Small...

On the other hand, not giving the plant enough new space will defeat the purpose of the entire transplant as the roots need new room to grow. Aim for 1-2” diameter increase for the new pot/hole. Go larger only if the roots look extremely cramped in the old container.

Inside vs. Outside

Some plants do better indoors than they do outside. You’ll want to make sure you know what your climate zone is and what plants can survive throughout the seasons, especially in Colorado. Check out our winter prep guide to find out what to do when old man winter comes a knocking.

Step-By-Step Guide To Transplanting Plants

Here’s a step-by-step guide you can use every time your plants are ready for a new home. These three simple steps will help ensure your plant babies love their new home and can survive the move. Remember to not rush the process! Time is your friend here.

So, you’re ready to get to repotting! First, make sure your new pot is cleaned out, sanitized and dried. Take care not to leave any chemicals! If you’re planting outside, moisten the soil first. If you’re repotting, fill the pot about halfway with organic potting soil then moisten that. Next, dig a little crater in the soil. Not too deep, as you don’t want the roots touching the bottom of the pot.

Now that the new home is ready, it’s time to get to the roots of our project. Literally, roots! Let’s moisten the plant with some more water and give it a nice massage on the sides. Squeezing the sides can help break up the soil and make the plant easier to remove. Remember, water is your (and your plant’s) best friend! 

Continue squeezing and massaging the soil around the edges as you slowly tilt the plant upside down, letting the plant fall out of the pot. It’s important to remove the old soil from around the root ball to prevent root rot. Set the plant in the new container or hole and fill the remaining portion with the new organic soil.

We don’t want to pack the soil too tight because then the plant can’t breathe. However, leaving the soil too loose could let your plant fall over. Doesn’t sound like the most comfortable way to nap. Our experts recommend adding 2 inches of organic potting soil above the root cluster and gently packing that in, but again, not too tight. Don’t forget, your plant’s roots need to breathe!

If you want some extra credit, add ¼ inch of compost to the top of the soil, and gently rake in. This helps give the plant some extra nutrients without the stress of chemicals. You’ll want to wait before adding any fertilizer until the plant becomes stable again in the new environment.

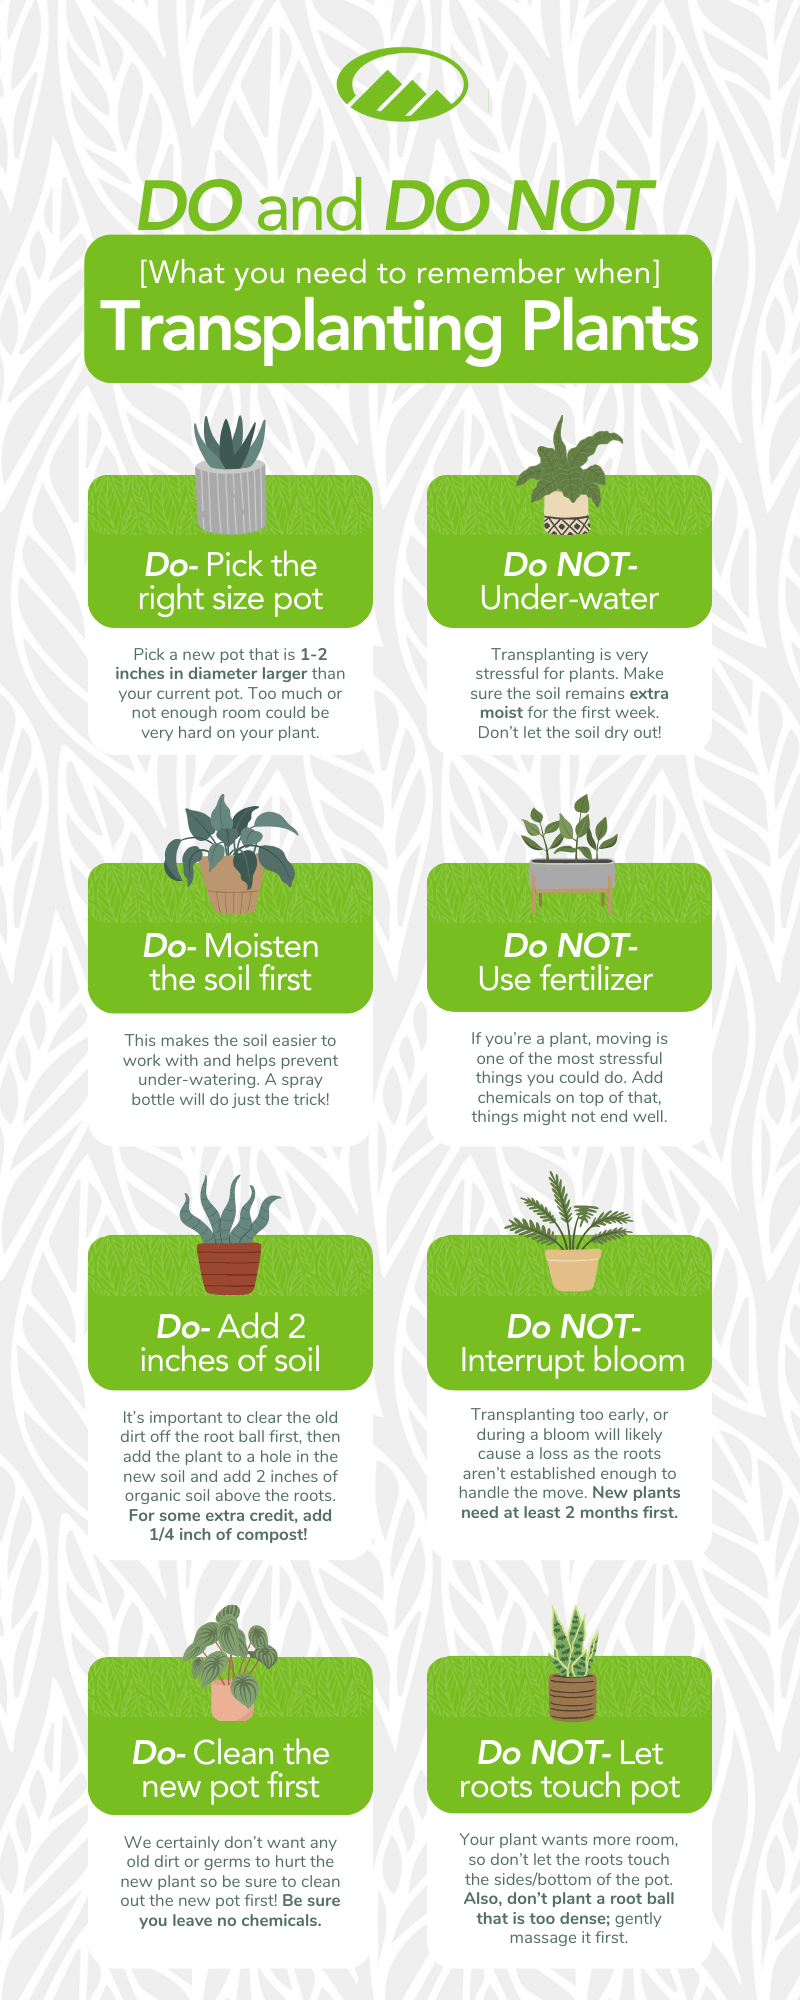
DO and DO NOT When Transplanting

DO These

  • Clean and dry the old pot thoroughly.
  • Pick a new pot/dig a hole 1-2 inches in diameter larger than the current pot.
  • Make sure the hole is deep and wide enough.
  • Clean off old dirt from root ball.
  • Moisten the soil first.
  • Leave 2 inches of organic potting soil above the root ball.
  • Add ¼ inch of compost to the top of the soil.
  • Water again.

DO NOT Do These

  • Pick a pot/dig a hole that is too large, or the same size as the current one.
  • Place a root ball that is dense into new soil.
  • Let roots touch pot.
  • Leave exposed roots.
  • Leave old dirt on the roots.
  • Forget to water.
  • Use fertilizer (yet).
  • Interrupt the blooming process.

Wrapping It Up: The Final Scoop On Repotting

Now you know how to repot all your plants – both in the comfort of a beautiful new pot and in the wild beauty of the outdoors!

Have a house full of succulents? The transplanting process is the same for most house plants and succulents. This includes common plants like aloe vera, fiddle leaf fig, monstera, pothos, African violets, and even orchids! 

Transplanting can be a fun way to spice up your décor with new pots, get your garden going from seedlings and overall keep your plants healthy and happy. 

Remember not to increase the container/hole size too quickly, and to make sure the soil stays very moist after the transplant. Under-watering after a transplant is the number one cause of failure, so make it rain! Consider setting a reminder on your phone or establishing an irrigation system.

Good Read? Share With A Friend!

Ash Tree Leaves

The Invasive Emerald Ash Borer: Protecting Colorado’s Ash Trees

April 9, 2026 No Comments

The invasive Emerald Ash Borer continues its relentless spread through Colorado, presenting a growing threat to our state’s diverse ecosystems. With its presence now confirmed

Read More »

Winter Landscape Maintenance Tips for a Healthy Yard

March 6, 2026 No Comments

Winter landscape maintenance plays a critical role in protecting your yard during Colorado’s harshest months—even when everything appears dormant. Winter has a reputation for putting

Read More »
christmas lights guide

Colorado Springs 2025 Christmas Lights Guide

December 1, 2025 No Comments

2026 Countdown Days Hours Minutes Seconds Traditions are important, and we’re honored to be part of yours. The holiday season is here again, and so is

Read More »
Rustic Fall Outdoor Décor: Cozy, Clever, and Perfect for Colorado

Rustic Fall Outdoor Décor: Cozy, Clever, and Perfect for Colorado

September 23, 2025 No Comments

Rustic fall outdoor décor is more than just a style—it’s a Colorado vibe. Crisp mornings, golden aspens, and that unmistakable sound of leaves crunching underfoot call

Read More »
Laying sod for new garden lawn - turf laying

Telltale Signs It’s Time to Renovate Your Landscape (And What to Expect)

September 19, 2025 No Comments

Is your landscape sending out distress signals louder than your neighbor’s leaf blower at 7 a.m.? Maybe your shrubs have taken on that “post-apocalyptic hedge

Read More »
Plant Establishment in Colorado Springs: Why It Takes 3–5 Years for Xeric Plants to Thrive

Plant Establishment in Colorado Springs: Why It Takes 3–5 Years for Xeric Plants to Thrive

September 12, 2025 No Comments

You’ve just installed a brand-new xeriscape full of native flowers, grasses, and shrubs. It looks beautiful, and you’re excited for years of effortless beauty with

Read More »
Recent Posts
  • The Invasive Emerald Ash Borer: Protecting Colorado’s Ash Trees
  • Winter Landscape Maintenance Tips for a Healthy Yard
  • Colorado Springs 2025 Christmas Lights Guide
  • Rustic Fall Outdoor Décor: Cozy, Clever, and Perfect for Colorado
  • Telltale Signs It’s Time to Renovate Your Landscape (And What to Expect)

What can we help you find today?

Categories
  • Christmas Lights
  • Commercial Landscaping
  • Green Living
  • Irrigation & Water Conservation
  • Landscape Design
  • Landscape Maintenance
  • Lawn Care & Gardening
  • Our Work
  • Outdoor Lighting
  • Outdoor Living
  • Plant Guides
  • Project Ideas
  • Purchasing Tips
  • Residential Landscapes
  • Spring/Summer Tips
  • The Incline
  • Trail Building
  • Tree Care & Plant Health
  • Winter/Fall Tips
Contact us

8110 Opportunity View,
Colorado Springs, CO

(719) 638-1000

Timberline Landscaping is part of the TimberlineOne family of companies, cultivating better places to live, work, and play.

8110 Opportunity View,
Colorado Springs, CO
719.638.1000

Timberline Landscaping is part of the TimberlineONE family of companies, cultivating better places to live, work, and play.

Linkedin-in Twitter Facebook-f Pinterest-p Instagram Youtube
Arrow-up
Linkedin-in
Twitter
Facebook-f
Pinterest-p
Instagram
Youtube
A TimberlineOne Company

Privacy Policy | HTML Sitemap | XML Sitemap | Terms of Service
© 2026 Timberline Landscaping